Admit it, “Every biker hates the sight of frayed cable ends, which not only frustrates the rider but could also get stuck in a biker’s trousers or shoes.”
With that awful situation, you as a biker must have this question in mind that how to crimp bike cable ends?
The answer to this question is simple, “You either use bicycle end camp with crimping tools to compress the cable ends. Some other methods might include using heat shrink tubes, electrical tapes, super glue, or even nail polish.”
That said, we are here today to guide you on how to crimp the bicycle cable ends with a crimper.
Along with that, we will also discuss some cheap DIY methods to help you get rid of this problem once and for all.
Let’s get down to the matter in hand;
A Little Bit About Bike Cables and How They Work
A mountain bike usually has two types of cables available, i.e. brake cables and shifter cables.
That said, a normal bicycle cable is composed of two different parts such as:
The internal wire that’s made up of braided steel and the Outer housing is also made up of steel and is usually wounded in a coil.
Coming towards the working interface, bike cables work on the principle of Newton’s 3rd law of motion, i.e. “Every action has an equal and opposite reaction.”
In a similar fashion, when you push the outer housing, it exerts a force on the internal cable, thus causing the bike to either shift a gear or to apply stoppage to the tires.
That was all about how bike cables usually work.
Now, the main problem with bike cables is that their ends often fray or become damaged as they are not properly protected.
In that case, the only solution to keep these cables away from fraying and wearing is to crimp them properly.
Here is how the whole process looks like:
Steps to Crimp Bike Cable Ends with a Crimper?
To keep your cable ends safe from fraying, you will need the following things to get started with crimping:
Things You Will Need:
- Cable end cap made up of aluminum or steel
- A Cable Crimper Tool
Step 1: Twist the Stranded Housing
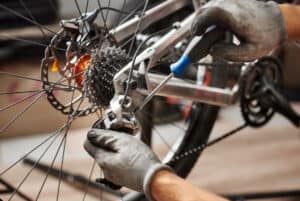
Start twisting the frayed ends of a cable until it gets properly tangled again. Wear gloves to keep your hands away from bleeding. If you cannot twist the housing manually, use pliers to tangle it till the end.
Step 2: Cut a Small Portion of Cable End
Right after you tangle the outer housing properly, cut its small portion while using a cable crimper tool.
The tool that we have mentioned above could also be used as a cable cutter. So, apply little pressure and let the tool do its job accordingly.
Step 3: Put Steel End Cap
Put the steep end cap after cutting the wire and ensure that you adjust it properly before applying the compress.
Step 4: Use Quaxer Crimper Tool
Quaxer crimper tool comes with a 4-point mechanical system in the center. It offers a perfect compressing interface.
Use it to tighten the end cap until it gets properly attached to the cable end.
Step 5: Move Cable Backwards If You Want
Finally, move the cable backward a little bit if it’s still messing up with you while you ride the bike.
And THAT’S IT!
You have successfully crimped the mountain bike cable ends without any problem.
Some Other Alternatives to Cable End Caps
Not every biker can afford a crimper tool or bike cap ends and this is where an alternative crimping method could become a blessing in disguise for them.
Some of the methods that we have tested go as under:
Heat Shrink Tubes
Heat shrink tubes can work as a perfect alternative to using end caps.
To apply it, cut a small piece of tube, slide it to the end of the cable and start heating it until it tightens or shrinks. The heat shrink coated cables will become safe and protective enough this way.
Heat shrink tubes are not only cheap and safe, they also come in different colors that could improve the beauty of your MTN bike for sure.
Use Nail Polish
Nail polish works just like super glue and it can keep the cable ends away from getting frayed or untangled.
Just like the color possibilities in heat shrink tubes, you can get a nail polish color that goes well with your bike and use it to tangle the stranded cable ends easily.
Solder the Ends
Soldering is one of the best crimping methods to secure the stranded cable ends. However, it’s usually a complex job and if not done properly, you will probably damage your bike.
We always recommend going to a bike repair shop, especially when you opt for the soldering process. Other than that, if you are good at soldering, do it yourself, but be careful enough of the surroundings.
Electrical Tape
Another cheap yet safer option to keep the cable ends tangled is to wrap them up with electrical tape. You can easily get yourself such a tape from a bike repair shop or any local retailer.
Super Glue
Last but not the least, use some super glue and apply it to the end of the cable. Let it dry to make sure that the cable remains tangled for a long time without any hassle.
Final Takeaways
Crimping the bike cable ends is a necessity as it can keep the cables safe and protected from unwanted fraying and straying.
You can either crimp the cable ends while using an end cap and a crimper tool.
OR, you can apply other DIY methods such as using nail polish, heat shrink tubes, electrical tape, or super glue as an alternative to end caps for protecting the cable ends.
Good Luck!!