“Nice bike, mate! What amount of squish does it have?” You have probably heard someone ask that. Squish means suspension travel, which means the length between the crown and the lowers in millimeters.
Mountain bike suspension systems are a vast but exciting topic that might leave you with more questions than answers.
We are going to answer as much as we can. So if you are looking to buy an MTB or just want to learn about bike suspension, stay tuned.
All Types of Bike Suspension
There are two types of suspension systems, namely:
- Forks
- Shocks
We will review every system individually and provide as much crucial information you need for a better judgment.
Forks
If your bike came with a rigid fork, you might need to read this if interested in upgrading. Also, if your bike came as a hardtail, which means only the front fork, you still might want to upgrade your forks’ quality or travel.
This is important for you to read, as well. Lastly, if your bike is a full suspension, you might still want to read about the systems and see how you can upgrade yours.
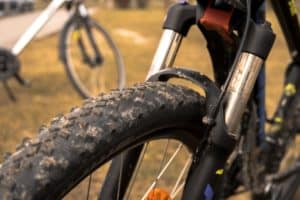
Forks may look like simple basics, but they are not. It takes lots of research and a whole team of innovative minds to build those forks and make your rides as smooth and comfortable as possible. Forks usually have two upper legs – the stanchions, sliding into another pair of conjoined lower legs, also known as the lowers ones.
A Cannondale Lefty is the only fork with the one-sided upper and lower leg, and the lower leg slides into the upper leg. Downhill bike forks have dual crowns.
The rest of the forks from all MTB disciplines have a single crown. The crown is the top part of the fork holding the stanchions and the steerer tube together.
As mountain bikes advance, the rider’s weight is getting shifted to the front. The forks take the most weight when descending and braking. Generally, the forks work like telescopic tubes.
It should steer well and provide a spring action without affecting your ride. The spring action is also known as damping.
The damper generally improves how the suspension reacts to rough terrain. Below is a list of fork’s features you should know and their purpose.
Spring
A fork must have a spring mechanism that allows it to absorb the shock. The older versions of forks had a coil spring, but now that’s for entry-level forks and feature in most inexpensive bikes. Mid-range and high-end forks are air-sprung and feature in top-of-the-range rigs.
A coil fork has a spring on only one side of the leg lower. Air forks, on the other hand, work via a chamber controlled by a single valve.
The air spring can be adjusted through volume spacers, which are technically rubber bands on the stanchions, usually on one side.
Dampers
Dampers work hand in hand with the spring. The purpose of the damper is to control how fast the spring returns and compresses.
Most modern forks have a lockout just under the forks, which closes the damper and increases or reduces its functionality.
Air forks, especially, come with the spring on the left and the damper on the right. Observe how your bike behaves on rough terrain.
You’ll notice how conveniently compression and rebound are carried. That’s how crucial the damper is.
Axles and Fit
Gone were the days when bikes came with quick releases. Most mid-range and high-end bikes are now coming with forks that take through axles. Paired with sealed bearings, your bike will roll so fast –you’ll want to grab your brakes.
Axles are 15mm or 20 mm standard. Most bikes today are 29ers and 27.5ers, and their forks are generally the same height.
The fork travel of your bike might make your bike slacker and capable of hitting trails way better, but it will also raise the bottom bracket height. As a result, your bike will be unstable a bit.
The Structure
A fork is not as simple as it looks. Though it seems otherwise in the naked eye, that fork was engineered and created by professionals.
Suspension action and control are very crucial. The structural system of the fork holds the top of the forks with the lowers together with a stiffened brace.
This is to make sure that the fork is not shaking and causing some inconveniences. Forks have been made lighter and more stable. With the bolt through axle, you get more precise steering, better grip, and braking control. In fact, the little flex you feel comes from the wheel.
Also Read: The Right Way to Adjust MTB Suspension for Beginners
Fork Adjustments
Some low-end forks like SR Suntour XCE don’t come with adjustments, but the XCR does have most of them. It can be one knob, two, or more that you can play with to improve the response of your fork. All high-end forks do have these adjustments. Here are some of them.
Lockout
Most forks come with a lockout. It’s a lever on the right side of the crown that eliminates travel (your fork stanchions going in and out of the lowers. The lockout locks the fork and helps save the rider’s energy on a climb or when riding on a smooth surface.
For more advanced bikes, forks get a remote lockout. The remote switch can be found on top of the bars on the left to make work easier. It saves you the energy of bending down to lock the forks.
Preload/Shrader Valve
Coil-sprung forks come with the preload feature–a knob that sits on top of the left stanchion on the crown. The preload increases or decreases the tension of the forks spring if the fork feels too spongy or too rigid.
An air pressure fork has a different mechanism, which is a Shrader valve that helps adjust the air pressure and the firmness of the fork. Even though FOX indicates using a special pump, I use the portable bike pump to fill my air pressure tank.
Damping
Coil sprung forks contain damper rods while air forks have an oil batch, both helping with damping. Damping, as explained before, moderates the rate with which your forks compress ad rebound.
Compression is when the forks absorb the impact. Rebound is when the fork extends back to its original state after compression. Without correct damping, your rides will feel unnatural.
Sag
Sag determines if your forks have the correct air pressure of the coil spring. It’s all about how much your forks compress when you are riding on the bike. You measure sag by simply wearing everything and carrying everything you carry when riding your bike.
To achieve the correct sag, you may need to read the listed numbers on one of the stanchions. Here, the professional shock pump comes to play. You’ll need to remove the right amount of air from the fork.
If you don’t see such markings, you’ll need to use the rubber o-ring and measure the sag with a ruler. The sag is the total amount of travel you have left when you are on top of your bike. You can tell by the length of stanchion that remains when you load weight on your bike.
Popular Fork Brands
My first bike was a beginner’s bike, and I didn’t know much about forks back then like I do now. The bike had an SR Suntour XCT fork and back then, I never thought of how uncomfortable it was until I upgraded to a bike with a FOX 32 Rhythm forks. Life has never been the same again.
All FOX and 95 percent of RockShox Forks come with air suspension. While many brands go for these types of forks, some have their custom forks, for example, Cannondale with their Lefty.
Giant launched in-house suspension forks, Crest 34, in 2019. Here is a list of popular suspension brands.
- RockShox
- FOX
- Cannondale Lefty
- Crest 34
- SR Suntour
- Marzocchi
- Manitou
- MRP
- Cane Creek
- Ohlins
- Bos
- DVO
- Push
Rear Shocks
For hardtail owners, this is the part where it might sound like a foreign language. You are welcome, though, in case you decide to upgrade. Some passionate MTB riders do have hardtails and full suspensions but don’t stress yourself if you can’t afford both.
The main difference between a hardtail and a full suspension is the rear suspension. While most riders focus on the forks and overlook the shocks, the latter is crucial, especially on how they fit and work with the frame.
So, when upgrading your suspension rear shock, you will be doing it based on performance and not the suspension travel. Changing the bike’s travel may affect the geometry and how the frame of the bike is structured.
Shock Features
Springs
Just like in the forks, shocks have a working mechanism that involves springs. It can be a coil or air spring, depending on your preferences or what you choose.
The only difference between a fork coil and a shock coil is that the former has the coil inside the lowers, while the latter has one outside and visible.
Most trail and enduro bikes come with air shocks to minimize weight and for easier spring tuning. Downhill bikes come with a coil unit in the rear, now that DH bikes don’t have to be lightweight. Still, some enduro riders prefer the coil shock.
Dampers
Shocks do have dampers, which you already know what they do. However, a shock comes with three damping settings, namely:
- Rebound damping
- Low-speed compression damping
- High-speed compression damping
Rebound damping is the most important of them all. When the shock compresses, the damper gets out and adds more as the shock goes back to its original state whenever you run over an obstacle with the rear wheel.
Low-speed compression damping has a different role. It holds the shocks higher up to store some compression whenever the rider runs over berms or stair-step drops.
High-speed compression and damping, on the other hand, should be the default setting of your shocks unless you are doing landings.
Sizes and Fit
The size and fitting of the shock vary with the bike frame. Initially, shocks were sized with inches, but now they are measured by millimeters like the forks.
So, a 120 mm rear suspension travel will mean that the trail bike has a 120 mm shock. So, when buying a shock to upgrade, you should consider the fitments and strokes and confirm whether they are suitable for your frame.
However, you can adjust your bike’s geometry and lower or lift your bottom bracket height by just using offset shock bushings. They completely change how your bike rides and handles. It’s basically your decision to make, and what size is comfortable for you.
Stroke Travel
Stroke travel refers to the compression length of the shock. The shock links the frame lever and the rear axle. Wheel travel is much greater than stroke travel.
Wheel Travel
Wheel travel is different from stroke travel. Actually, wheel travel refers to the wheel’s reaction after a compression. In most cases, the front and rear wheels have the same travel, while the forks and the shocks might have a different amount of travel.
Shock Adjustments
The traditional coil springs do not have any adjustments settings, making the bikes uncomfortable on rough terrain.
These cheap coil springs also create ineffective pedaling. The modern shocks, on the other hand, come with adjustment settings.
The shock has the same adjustment settings as the fork and so no need to discuss them. Sag is one of the essential features of a shock. The suspension compresses under the rider’s weight. The air shock has an air valve, while the coil one has preload adjustment.
Rear Suspension Designs
Bike suspension designs come different, and you would have a tough time buying a suspension bike if you don’t know what design works for you. Bike disciplines come with varying designs of suspension. We are about to review them all with their advantages and disadvantages.
Single-Pivot
Single-Pivot is the most popular rear suspension system. The vast majority of cheap Chinese bikes come with this design. Low-budget bikes from acclaimed brands also do come with this type of suspension.
In this design, the rear wheel axle pivots just behind the bottom bracket. The shock is attached between the rear axle and the top or down tube. The swingarm holds the rear wheel.
The single-pivot design is the most popular because it does not have a patent and so brands can freely use it. Therefore, there’s mass production of this design, and so it’s readily available. Bikes with this system are also simple to produce, so the bikes come cheaper.
An example of a single Pivot Bike is the Orange Stage.
Pros
- Requires fewer bearings
- Requires less maintenance
- A simple and consistent design
Cons
- The design causes unwanted characteristics with every pedal stroke when the shock absorbs.
Linkage-Driven Single Pivot Suspension
As you might have suspected, this design is almost the same as a single pivot system, but there’s one difference – a linkage is involved. Here, the rear axle holding the rear wheel is connected to the main pivot but with linkages connecting the shock.
The design is also known as a ‘faux bar’ because it uses the traditional four-bar design while marinating a single pivot point. The linkage-driven single pivot point makes the suspension softer on small bumps, thus making pedaling more efficient.
This design comes in different forms, but as long as the chainstay between the main pivot and rear axle exists, the form falls under linkage-driven single-pivot suspension.
Pros
- Offers more freedom to fine-tune the leverage ratio
Cons
- More linkages translate to more pivots and bearings, and so higher maintenance costs
Horst-Link Suspension
Many high-end bikes use the horst-link suspension design, especially Specialized with their FSR. Horst link involves the pivot at the axle end, another pivot on the seat tube, and the third pivot holding the shock. The last pivot connects the chainstays to the area above the bottom bracket.
This design allows anti-squat and anti-rise features to be optimized in all stages, unlike the single pivot design.
Brands that use this design have gone further into developing their technology with it. A perfect example is Scott Sports’s 2022 Scott Spark enclosed rear suspension, a technology they know own after acquiring Bold Cycles.
The horst-link provides various solutions, including preventing the suspension system from being impacted by the braking forces.
High anti-squat increases the pedaling efficiency. That’s just one of the areas the horst-link suspension edges all the other designs.
Pros
- Allows high level of tuning over the leverage ratio curve as well as the anti-rise and anti-squat characteristics
- Anti-rise is lower on Horst Link than any other design.
Cons
- To minimize pedal kickback, horst links are mainly built with low levels, which affects climbing performance.
Twin Link Suspension
A twin link sus is almost the same as a single pivot but with a solid swingarm. The swingarm is connected to the frame’s pivot by two rocker links. Perfect examples of suspension brands are Santa Cruz’s VPP suspension and Ibis DW-link suspension.
Twin link uses four pivots, and designers have the freedom of modifying the position of the center. The center shifts significantly as the rider rides their bike. As a result, the anti-squat and anti-rise levels are optimized all along.
Depending on the brand, the two rocker links of your bike’s twin link suspension can move in the same or different directions.
Santa Cruz’s VPP used in bikes like the Santa Cruz Hightower uses counter-rotating links, while Ibis’s DW-link’s has its rocker links rotating in the same direction.
Pros
- It provides designers with the freedom to tune the suspension characteristics
- Provides consistency of the anti-squat and anti-rise
Cons
- Designing twin links is a highly complicated process. The smaller the links in the small spaces, the lesser space there’s for tenability.
| MTB Style | Terrain/Characteristics | Travel: mm | Diameter of Stanchions: mm | Amount of Sag by % |
| Cross Country (XC) | Non-technical trails. Lighter weight and suitable for pedaling uphill. | 100-120 | 30-32 | 15-25 |
| Trail | Mixed terrain with a lot of trail features. Suitable for pedaling. | 120-150 | 34 | 20-30 |
| Enduro | Downhill gravity trails with bigger drops. Suitable for cruising on a rugged and rocky course. | 150-180 | 36-38 | 25-30 |
| Downhill (DH) | Steep, Rough downhill, highly technical gravity trails. Suitable for running over large rocks, drops, and jumps. | 180-200 | 40 | 25-35 |
History of Suspensions
Suspension forks and rear shocks started to evolve in the 90s. Mountain bikes have just become a norm in the 80s.
The earlier MTBs had road bike-like features but with wider wheels for a better feel when riding offroad. Fast forward to the 90s. Suspension forks became a thing as brands like Scott USA and Trek developed some of the best forks.
However, the rear shocks didn’t have the same success stories as forks. They were doing pretty bad. They suffered from mechanical issues, many would break, and riding a bike with full suspension felt sluggish and uncomfortable.
Full suspension bikes started evolving after 2005. Santa Cruz’s entry into the market marked the beginning of the innovative suspension technology, but no lie, the bikes were expensive than life. In a bid to remain relevant and grab the moment, Giant developed the Maestro suspension in 2006, and it became an instant hit.
Giant and Santa Cruz held the market for full suspension MTBs under 2000 before 2010, then other brands came in, and in the next 3 to 4 years, the full-suspension bikes were mainstream. Now almost every brand is doing well with their full sus bikes, although some few brands haven’t hacked it yet.
Wrapping Up
Suspensions redefied mountain biking, and they are here to stay. We have done our best to include every piece of information. If you notice we left something out, let us know in the comments.